
All bongs deserve love, but this article is all about gravity bongs, a truly special way to get toasted. You don’t need to have passed high school physics to use one, but there are some mechanics at work that you should know. Just like using a regular bong, you need to learn how they work, and maybe you’d like to know how to make one at home. It’s all below, guys.
What’s a Gravity Bong Again?
A gravity bong, lovingly referred to as a “grav” or “bucket bong” or “GB” or “geeb,” is a type of bong that uses air pressure and water to build smoke. That means you don’t have to pull the hit; the bong pulls it for you, so you can take a massive rip all at once. It’s sort of like taking three or four robust bong hits simultaneously, so it’s a lot on your lungs. And your head. And your sanity. But in a fun way.
Using a Grav

Gravity bongs are not intuitive, even if you smoke out of traditional bongs a lot. They can be a little tricky, but once you get it, you got it. Here’s an overview of how to use a gravity bong to get sky-high.
If you need more guidance, watching this couple use one might be helpful.
1. Get Set Up
Fill your grav bong 75% full with water and place it on a low table or the floor. That’s an important part, because you need to go in from a vertical angle to hit the bong. It’s basically impossible to hold it and hit it like a traditional bong.
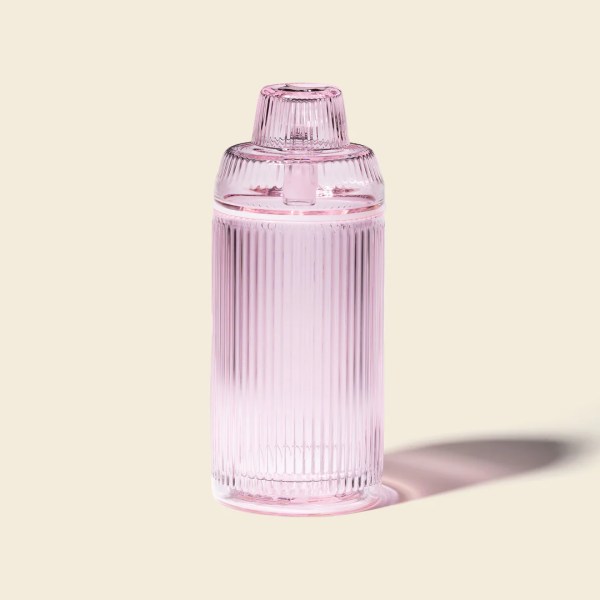
Pack the bowl. For your first gravity bong experience, you may want to pack a tinier amount, like how much you would put in a one-hitter. I love the smaller bowl on the NWTN Home Vesper Gravity Bong for smaller rips.
2. Get Ready
So these bongs are made up of three main parts: the shell, the core, and the bowl. The bowl is the bowl, obviously. The shell is the larger cup-like piece that sits on the table. The core is the funky cylinder that fits snugly inside the shell.
This step is easy, just hold the top of the core and hold the lighter over the bowl.
3. Get the Smoke
Here’s where you need some finesse, and you may need to try a few times to get it. Flick the lighter and at THE SAME TIME, pull up the core in a slow, steady motion. The pressure inside the core will pull air through the bowl. Smoke should build up in the core above the water line.
Think about smoking a pipe. You have to inhale in order to light the flower. It’s the same concept, but the bong is creating the airflow instead of you.
4. Keep the Smoke
Stop lifting the core up just before the bottom of it meets the water line, so the core is still slightly submerged. If you lift it out of the water completely, you’ll lose all the smoke out of the sides. Hold it steady.
5. Go in for the Hit
Drop the lighter. I recommend standing up here. Remove the bowl and put your mouth over the hole where the bowl was. The core should still be lifted, so you’re holding it in a floating position as you bend toward the bong.
6. Take the Hit
Inhale while pushing the core back into the shell, until it touches the bottom. Don’t go too fast, but don’t go too slow either. You gotta find that Goldilocks speed.
The pressure from the water and trapped air will force the smoke out, making for a super intense hit. Be careful not to inhale too hard, or you’ll get a mouthful of water. And don’t cough or exhale into the bong, or water will go everywhere. These are rookie mistakes that you might just have to do to live and learn. Don’t keep important non-waterproof things near your gravity bong.
Making DIY Gravity Bongs
DIY gravs are a classic stoner invention. There are many ways you can make one, but I’ll share my tried and true process. These are makeshift, but you can always buy a nicer gravity bong, like the ones from NWTN Home.
You’ll need:
- A plastic disposable water bottle (I used to use Smart Water bottles)
- A slightly smaller plastic disposable water bottle
- A piece of tinfoil or a socket bit for bolts (I think that’s what they’re called. I don’t know. These things). You can also attach a glass bowl if you have an extra.
- Scissors or a knife
You can make things more intense by using larger containers, like a gallon jug or bucket. But the large and medium Smart Water bottles fit so perfectly into one another.
- Cut off the top 20-30% of the large bottle.
- Cut off the very bottom of the small water bottle.
- Cut a hole in the smaller bottle’s cap.
- Create a makeshift bowl in the cap using either the tin foil curved into a bowl shape or the screwdriver bit wedged into the hole.
Das it. Just fill the large bottle with water, put the smaller one inside it, and follow the instructions in the previous section. Good luck.
Beautiful Gravity Bongs to Try
The NWTN Home Vesper Gravity Bong is curvaceous and gorgeous, like fine art.

The NWTN Home Deco Bong is just as glorious, with an edgier look.
For a high-tech feel, try Stüdenglass’s Gravity Infuser Bong.

Gravity Infuser (opens in a new window)
What to put in your Grav: THCA FLower RECS
Mood’s Super Lemon Haze is a lovely summertime strain, delivering a euphoric and uplifted feeling, along with a cloud of sunny haze.

Secret Nature’s Cherry Kush strain is like wrapping yourself in a weighted blanket and dimming the lights.

Cherry Kush THCa Flower (opens in a new window)
Check out our full guide to the best THCA flower you can buy online to see more.
More
From VICE
-

(Photo by Stefanie Keenan/Getty Images for Cash App) -

(Photo by Rich Fury/Getty Images for The Recording Academy) -

-

Brett Coomer/Houston Chronicle via Getty Images